 While I do put in a lot of new products, sometimes fixing a concrete floor is a more cost effective way to get a great product.
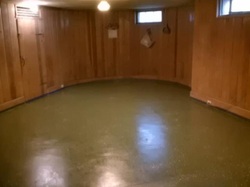
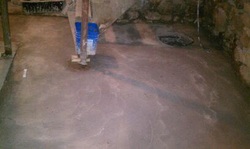
This last week I had a homeowner that wanted to fix up his basement floor, and after talking it over we decided to apply an epoxy product. Before applying the epoxy I needed to remove the carpet that had been glued down and then use and angle grinder to remove the old layers of covering. The grinding created a rough surface which is great for the bondability of the epoxy. I used two fans to try and contain the dust created from the grinding as much as possible. Because the house had poor ventilation it was difficult but the homeowners were great and once the dust was swept up, the floor was ready to go.
The epoxy we went with could be tinted to any color (the homeowner went with a green with special chips in it.) The epoxy was a high grade epoxy that went on thin. Eight hours later I applied a clear acrylic to add body and depth to the surface.
This job turned out to be a great, cost effective fix to bring back the usefulness of the basement, giving it durability and a great look.
 I am a huge fan of setting personal goals. They will change your life!
I'm not talking about thinking to yourself,"Boy I would like to ___." I mean the full fledged and committed kind of goals that you can't turn back from. Take sky diving for example- you might say “Boy I would like to skydive”, and write that down on your list as a goal for someday, or you can go ahead and jump out of the plane and then set a goal of walking back to your car in half an hour.
When push comes to shove, the second option is the one you can't turn back on, because there is commitment. Now it doesn't always take the most extreme type of "can't turn back" commitment, but in your mind you need to build a key concept. I guarantee that if you develop this concept you will be amazed at what you are doing every day.
You ready for it? Okay here goes. The key concept is this, "If I think it I must do it." this isn't to say that every little thing you think of you must do but more that you should replace the "Boy I would like to." with "I must do it." A year ago I would have said, "Someday I would like to work in an environment that would challenge me more and stress me out less. I’d like to participate in stuff like a 15k race. And what I’d really love to do someday is to go sailing on a weekend rather than trying to catch up with life after a week that was way too busy." Then I found the key- “I must do it”. I would tell myself this time and time again, beginning with the little things. When I was driving down the road and thought about how much I wanted to pass the guy going 35 mph in front of me I would find an opportunity to do it.
Today I am in a place in life's journey where I have used this key to unlock the opportunities to change my work environment. I’m training to run a 15k race this summer (currently running 12k three times a week ), and I’ve bought a sailboat so that I can spend Sunday afternoons on the lake with my beautiful wife.
Lots of thoughts here I know, but I think its important to keep challenging yourself. I encourage you to put your full trust in God, surround yourself with encouraging people and keep the key in your mind with all decisions “If I think it I must do it.”
Can’t wait to hear the places you end up going as a result! Leave me some comments with your thoughts and your goals you are going to accomplish!
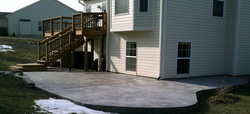 I've seen a lot of stamped concrete in the past five years- enough to know how well it lasts, what it can stand up against, and new products that can help to make it last longer.
Stamped concrete is a technique used in finishing concrete that gives the surface a look such as different kinds of stone or brick. The results of this product is a more cost effective patio, walk, or set of steps. They are as strong as the concrete used by the installer, whether it is 3000psi 4000psi
5000psi.
The traditional difficulty in product longevity is actually in the fine sand and Portland layer on the surface of the concrete. This fine layer is created as the concrete is tooled with screeding, bullfloating, and sealing. I love to figure out how things work and determine their weak points and then try to improve upon them. Because of this I have a different technique in the way I do stamped concrete- a cutting edge product that will last a couple years longer than the current competitors. I find that working the
concrete in the order of screed, bullfloat, and mag allows the concrete to get smooth and increases the surface strength while allowing for a better slip resistant surface.
Most stamped concrete uses a powder release for the mats. This release is not only messy but mixes the secondary color in the surface. When this color in the surface wears off it is difficult to recolor the concrete well. I use a liquid release that is clear and add the color later on.
The final touch to a great stamped concrete job is the sealer. There are a thousand different sealers on the market today. The most common sealer is one with a wet look. This sealer has several issues which include sun bleaching, toxic odors, flaking, and a thick seal which can make it slick to walk on. I have sealed stamped concrete for five years and used a few different products. The sealer I prefer is a water based sealer that gives a great wet look but also has a curing compound in it as well. This allows the concrete to cure as necessary over the next 28 days for the hardest concrete surface currently achievable.
I've had a great experience with this technique and the pictures below show a job I did this way. It turned out great and continues to look great even months later.
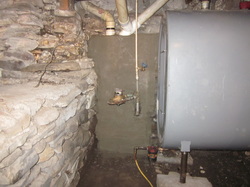 Wet stone basements are an awful pain in the neck to their owners. They have reduced storage usability and seem to attract little more than mold and a stagnate smell. My most recent project
is one such basement.
As I walked in to this project I could see a few straight-forward issues that needed to be addressed (you can see some of this in the “Before” pictures below) Most of the water was entering the basement from the outside of the house. After some investigation I traced the issue to the concrete apron. The apron had broken at some point broken and a large 20 in. by 24in. piece was missing. This was allowing all the water from both the driveway and roof to sit there with nowhere to go except into the house.
Looking at the inside you can see that all of the mortar that should be between the stones had washed out due to years and years of water funneling down and through some of the stones/ They were actually falling right out of the wall! Not a good situation at all for the homeowner.
There are lots of ways to fix this kind of problem and the solutions vary from expensive to relatively cheap options. I could have torn the whole wall out and replaced it with new block and waterproofed it from the outside, but not many people budget for that kind of expensive home repair. The most cost affective fix available was to try to shed the water from the obvious exterior point and
this is the option the homeowner chose to go with.
I replaced the missing portion of the exterior apron outside and cut back some of the driveway to allow for a slight pitch change as well. Then I went inside and pointed up the stone with Type S mortar with a waterproofing additive. In the places where stones had fallen out I built the wall back out with concrete brick and re-bar.
This project took two days on site. The two days were separated by a week to allow for proper curing. The second day that on the site I attached diamond mesh with nail-ins. The end product turned out great! It had good form as well as the function we desired to see. All around a great job.
PS- Please post in the comments any stories or questions you may have on the topic of “Leaky basements”. Can’t wait to read your stories!
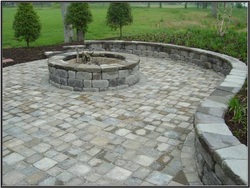 I love how I can use work and the jobs that I do to illustrate my views on life topics such as building relationships. For instance, I install paver blocks (Cambrige is my brand of choice) and in the whole process of the installation, there are specific steps that should be followed. If you don’t follow these steps the paver blocks will be weaker and able to work their way apart.
The first step of a proper paver block job is the excavation to move away some dirt. Often times people don’t realize just how much dirt needs to be moved and are unaware that this is a crucial step in the process! For a 25 foot sidewalk you would need to dig out 3 cubic yards of soil (that is a dump-truck load of dirt.) In most healthy relationships, it seems a dump-truck load of dirt and past needs to be removed in order to create a good base for a lasting relationship and start on a fresh foundation.
The second step in the process is to fill in the area you just un-earthed with 5 inches of compact-able stone to create a hard base to build on. Many relationships, whether work or personal, require some hard material to work off of such as a common hobby, a common work environment, a common belief system, or a common relative. Some of these common things aren’t strong enough though - it is like what I would compare to someone trying to install pavers by doing little to no dirt removal and just throwing some stone on the ground to work with thinking that it is sufficiently hard. Tcommonality needs to be something solid and grounded.
After that, an edge restraint is needed for the pavers. This can either be wood or PVC that will outline the scope of the job. Just like with pavers you need to create boundaries with people in your life that outline where you are with the person. Boundaries are necessary in any and every healthy relationship- my job requires job estimates so people know what to expect and where we stand with things,family needs to know where you stand in your convictions, and people need to know whether they can count on you or not.
After you set up the edge restraint, three quarters of an inch of clean sand is needed on the inside of the outline.This allows a surface that can move and fit in all the uneven spots and cracks. Its like forgiveness sand-we need to have a buffer of forgiveness in all good relationships. If I don’t have this forgiveness on reserve, then no matter how good it looks the relationship is on a rough surface and the next thing that pushes you will show through.
The final step in your paver project is to set the stones and then tamp them to compact them and lock them together. This is equivalent to doing projects together -the more pieces you put in the relationship the more magnificent the whole thing looks, and as the stress and impacts of time push on the relationship you form a tighter and tighter bond that locks you together in a
spectacular and unique way.
Each relationship has its own patterns and colors so whether is co-workers, friends, family or even a spouse you need to build these relationships well. The way you build them will be vital to their health and quality, just like pavers!
 Our project for this week was the replacement of a portion of water logged
basement floor.
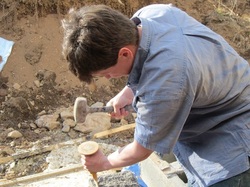
I did this project in three phases. The first phase consisted of using a sledge hammer and a leverage bar. Using the hammer I was able to break up the remaining existing concrete floor. In this case there wasn’t a whole lot of floor to break since the previous years of wet conditions had already done a lot of the job for me. Then, using a good pry bar (I like Stanley or Bostich as both brands seem to be quite durable) I was able to loosen and remove the broken up concrete debris. For this job I had no clear or direct route to the outside, so I had to solicit help in hulling the debris out in buckets. The last part of this phase was relieving a post jack and pouring a sonitube footer for it in the future. In some cases the sonitube may need to be designed by an engineer, but since it wasn’t a main support in this project I was able to do it. I used a twelve inch tube and cut it off for a ten inch depth and poured it with some fast setting concrete mix ( I prefer sakrete when purchasing bagged mixes) .
The second phase was re-grading the sub-grade level so that it is 4 inches below where you want your finished grade to be. On
this job, that meant hulling up some of the sub grade material because the previous floor was only 2 1/2 inches thick. That thickness is insufficient and will always fail. My new self-leveling Bostich laser level made re-grading a breeze! We also installed a 20 inch deep sub-pump pit to help keep any overload of water in the spring out of the basement.
Finally we made it to the third phase of the project ( I waited for a a week to allow the concrete to harden in the sonitube). I calculated up the number of bags of concrete mix we would need which ended up totaling around 50, and again enlisted help to transport it all through the house and to the basement. Once the material was on site my awesome wife mixed the concrete for me. I put a bit of bond additive into the concrete to make it more water resistant, something that is important in a basement area. With a bit of mixing, finishing, and babysitting it we finished another successful project!
Credits:
God- for giving us all we needed
The recruited labor- you were awesome with hauling all the materials
My new self-leveling laser
And to my wife, the grace of my life, for all her had work and support along the way.
Check out the before and after pictures!
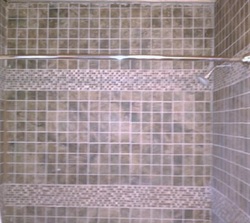 I finished the bathroom tile over the weekend and it looks great. Check out the picture of the final product. Its so nice to have it done!
I find it continually amazing to be able to bear witness to God's work in peoples
lives, and on occasion be a privileged helper to His people.
God has given us all great gifts and talents in life- gifts of friends, family, housing, and jobs. I think we often take these gifts for granted, or hold on to them selfishly. What I mean to say is that if God has blessed me with the
ability to walk and move freely with no pain, why do I “pay a cable bill” or any
other entertainment bill that encourages me to just sit around? I think the problem comes down to a matter of selfishness.
Nobody likes to be called lazy or selfish. I know it churns a fighting anger in me when I think of myself as either of them. This is the point at which a man of God must curl his upper lip at the mirror and and sit like an Atlas statue for a moment thinking to himself of all the people God has placed around him.As I thought for a moment I began to think of my elderly neighbor who could use to have her porch painted. She has even mentioned it a while back, but I have been too busy to think about that one for over a year. And then I though about my church family and wondered if I even knew how I could help them?
We all have a choice to make. We can choose to get up and do something, give someone something, meet a need of someone you know. Don’t wait for someone else to do it.
How will I work through this test of character in myself? I will work, I will give, I will care for those God puts on my heart. I will get up and see if my neighbor still needs her porch painted. I’ll help my family to finish some of their house projects so that they can show God’s grace and mercy to a young girl who has had nothing until now. And mostly I’ll just continue to consciously look for, and take advantage of, each opportunity God gives me to serve those around me.
I’m so thankful God has given me the ability to do these things becuase I know He has a specific purpose for us all, and I’m thankful for my wife, who helps and encourages me on this journey.
I encourage you to stand with me in this journey in creating a deeper fuller you. My challenge to you is to find a way to give something away, whether it be your time, your money, your love. Resolve in yourself to do this and I guarantee that you will have the blessing of seeing God at work all around you.
 My house is really old! It started as a 22’ x 33’ one room school house and was renovated in the 1950’s and again in the 1970’s to make it more livable. I am completely remodeling it now to give it a finished basement, new wiring, new plumbing, and a whole new layout.
This weeks project is to finish the tile surround for the new bath tub. It is quite a project for a house that isn’t square! I want to do each remodeling project the right way, so I went all out. Here are some of the tools I used and would recommend:
- A cheap paint brush
- A screw gun
- A notched trowel
-A tile saw
- A rubber sponge trowel
-A sponge
- A caulk gun and caulk tool.
First, I sealed the sub wall board with a paint-on waterproofer using my cheap paintbrush. These surfaces may receive some residual penetrating moisture over a longer continuous span (such as several showers back to back) and I wanted to make sure there is no chance of any water damage.
Next, I used the screw gun to screw a cement board product to all the surfaces I was going to tile. This makes for a stronger wall and creates a good bond-able surface.
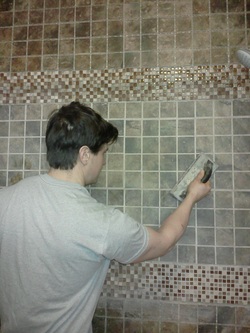
I laid the tile in a regular square fashion. I also used a mixed mosaic tile to form borders where the hand rail and curtain rod will be attached. I used the notched trowel to trowel the thin-set onto the wall. I wanted to keep more of the brown and woody look in this project so I grouted with a tan, moisture/mold resistant, sandless grout. It was a two part product using a grout enhancer in the water and then mixed with the powder.
I used the rubber trowel for application of the grout and a dampened regular sponge to wipe off excess grout.
The final step is to caulk around the seam where the wall and tub meet, along with all the corners. This allows for any future flexing of the house, and helps prevent cracks. (This will happen in any house using different materials ie. wood, cement, concrete, steel, block.)
Check out the photos below and come back this weekend for pictures of the final project.
The key, as always, in building projects is: are you going to do it cheap or right?
Whether you are building your life, family, career, relationships, or your house, if you build it cheap it won't stand the pressures of this world, so build it right. Be resilient! Thrive!
I’m very happy to share with you my first blog post!
In the coming weeks and months I’ll be writing about the adventures of life as I see it in my life, my family, my work, and my house.
I did something this week that I'm really looking forward to! I signed up for the “BoilerMaker" Race which is July. Its a 9 mile race and I'm trying to get my time down as much as possible these next few months. As a Christian, I am moved to believe that a mans character must be undergoing a constant refining process that would allow others to see glimpses of God and His ultimate plan in life. I think this is accomplished through building things like focus, perseverance and honor in life. I have seen how training for this race has affected not only my character, but also that of my wife. It is such a blessing to me to see how going to the gym and training together has turned into a shared hobby/sport. We are building an encourager and support coach in each other, and sharing a form of intimacy not many couples get the joy of experiencing. (like nights I am icing my knee after a bad run.)
Something I've reallybeen getting excited about lately is community involvement. I find it good to be able to rely on people- after all we need people in our lives to help cause us to become all that God intends us to be. The other day I stopped by the local town
building to pay my taxes and gave the clerk my business card along with a verbal open offer for my free labor to any Town masonry projects (ie. parks, sidewalks, memorials.) Its my way of trying to give back to people that I share this Town
with. (Acts 20:35) And hopefully through this I will be able to drive my abilities to work in a broader field.
Thanks for stopping by! Come back next Wednesday for a post about my home bathtub tile job. Its going to be awesome!
|


 RSS Feed